Shapes, Buffers and Display
This is a rather technical chapter with only a few examples and demos, however it takes a look inside some of the pi3d source code with two-fold aims: one is to see how the information needed by the shader is held by pi3d objects and the way it is sent when the draw() method gets called, the other aim is to get used to opening up the source code of the module to figure out any problems using it.
In the the pi3d documentation ReadMe there is an ultra minimal example:
import pi3d
DISPLAY = pi3d.Display.create()
ball = pi3d.Sphere(z=5.0)
while DISPLAY.loop_running():
  ball.draw()
Which seems to be at odds with the requirement that there has to be a Camera, Light and Shader object in existence to draw any of the standard Shapes. The answer is that all these classes inherit from the DefaultInstance class as explained in the Shape.draw() description below.
If you open pi3d/shape/Sphere.py in an editor you will see that it is relatively brief. Almost all of the functionality comes from its parent class Shape and this is the case for everything in the pi3d/shape directory:
Building   ElevationMap     LodSprite    Sphere       Tube
Canvas     EnvironmentCube  MergeShape   Sprite
Cone       Extrude          Model        TCone
Cuboid     Helix            MultiSprite  Tetrahedron
Cylinder   Lathe            Plane        Torus
Disk       Lines            Points       Triangle
Shape
Have a look at the source code for Shape. Don’t be dismayed by how long it is - the majority of it is just convenience methods for:
1. setting the uniform variables array (self.unif, remember uniform variables from chapter two - one of the four categories of data passed to the GPU shaders),
2. setting the uniform variables held in the Buffer list (self.buf[0].unib, I will explain the relationship between Shapes and Buffers below),
3. updating the matrices (see rotateIncY() on line 655, you’ve already used that method in 3D_matrix02.py and the process of writing sines and cosines into an array should be reassuringly familiar!)
However the draw() method does several important things. Firstly, on lines 162 and 38 (which is in __init__() actually!) you will see the method instance() being called for Camera and Light. These three classes inherit from the DefaultInstance class and the method will either return the first instance of that class that has been created, or if none, it will create one.
Most of the time the default Light is fine - it’s a neutral directional light. The default Camera is also what you want for normal 3D viewing, but there are occasions when you need to overlay 2D objects in front of a 3D scene and this can be done by using two Camera instances and assigning each to different objects. The default Shader is much more of a fall-back position. This is because it has to be a “material” based Shader rather than one that relies on Textures being loaded. When we look inside the Buffer class you will see why a default material can be set easily but default textures would be messy.
The second thing to look at in the Shape.draw() method is the section from line 164 to 202. This is basically the matrix multiplication we did by hand in 2D_matrix01.py and 3D_matrix01.py Because this has to be done for every object in the scene in every frame it is time critical and this has been found to be the fastest combination 1) use numpy dot() [1] 2) set flags everywhere and only do the dot() when something has moved or rotated.
Before we follow line 207 to the Buffer.draw() we’ll just have a quick scan through the Shape.unif array which occupies lines 40 to 50 (with a comprehensive description of what it all is underneath it). The first twelve values are taken from arguments to the __init__() method and only offset should need any explanation. This allows objects to be rotated about different points than their self origin. Fog is a shade and alpha value that is “merged” by the Shader starting at a third of fog distance and increasing to 100% fog values at the full fog distance. Shape alpha allows objects to become partially or completely transparent. The Light values get stored here, in each Shape, even though there is a separate Light object. This means that it’s possible to illuminate objects within a scene with different lights. Although there looks to be space for two lights for each Shape all the Shaders (so far) only calculate illumination on the basis of the first one. Lights will be discussed in a later chapter but they essentially have a flag to mark them as “point” or “directional” which determines how the x,y,z vector is interpetted, an RGB color value for the light and RGB for ambient. The final eighteen values are available for special shader effects.
N.B. If you are eagle-eyed and have been paying attention you will have noticed a “proteted” function [2] in Shape, _lathe() that is used by the majority of the pi3d/shape classes. This method provides a convenient way of generating objects with rotational symmetry - though there are modifiers that can produce variations such as spirals and helices.
Buffer
This class gets its name because it’s the object used to hold the attribute array and element array which are both created by calling the OpenGL function glBufferData(). The reason why it’s a separate class (rather than just being part of Shape) is that one Shape can be constructed from several parts, each with its own Texture or material properties. This is particularly true of Model object i.e. Shapes that have been designed elsewhere and saved as obj or egg files.
The Buffer class is also complicated-looking and has more opengles function calls than Shape. There are a few things worth noting about this class
1. The “constructor” __init__() takes lists of vertices, normals, texture coordinates and element indices, as we would expect. However if the normals argument passed is None it will calculate a set of vectors at right angles to both the triangle edges that meet at each vertex [3]. It can also be made to construct smaller buffers by being passed empty lists for the texture coordinate and or the normals when these are not needed i.e. for Lines, Points or a non-texture-mapped Shape.
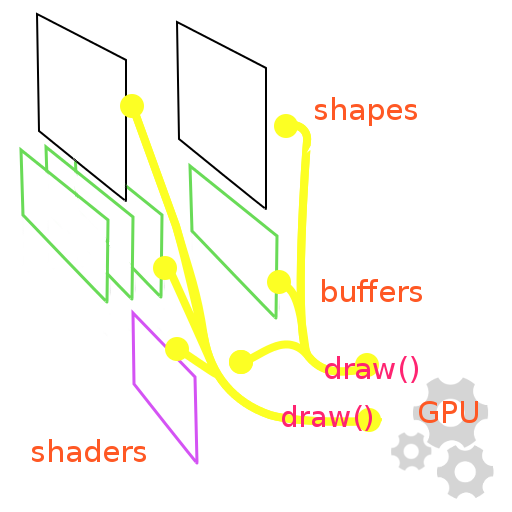
2. The draw() method (which is called by Shape.draw() as we saw above) passes three 4x4 matrices to the shader on line 260 then on line 263 passes twenty 3x1 vectors as the Shape.unif array, both of these being arguments to draw() supplied from Shape.draw(). The attribute and element arrays are passed to the Shader on lines 271 to 278 and on line 304 four 3x1 vectors, from Buffer.unib (which I will explain in more detail below). draw() also passes the Texture samplers from line 283. NB when I say “pass” the data it is only the pointer to the data that needs to be transferred, the actual arrays were set up in the GPU memory space when the Buffer was created and just need to be switched on (which is very quick). However...
3. There is a re_init() method that can be used to alter the values of the vertex, normal or texture coordinate vectors from frame to frame. This requires more processing than simply enabling data that is already there but it is much faster than scrapping the previous Buffer object and creating a complete new one.
Moving vertices, normals or texture coordinates isn’t something that needs to be done very often but it might make an entertaining exercise in this otherwise fairly wordy chapter. Copy the example program from the start of this chapter into an editor and make sure it runs OK (there’s no way of stopping it as it stands apart from Ctrl+C to break or closing the window). Then add some distortion, straight after ball.draw() at the same indent along the lines of:
bufr = ball.buf[0]        # only one Buffer in the list buf
b = bufr.array_buffer     # this is the array buffer!
lenb = len(b)             # length of the array (195 actually)
import numpy as np        # python will do this just once!
b[:,0:3] *= np.random.uniform(0.99, 1.01, (lenb, 3)) # below..
bufr.re_init(pts=b[:,0:3]) # finally re make the buffer
If you are not used to numpy you will probably be bamboozled by the fifth line. This is how numpy works: the looping is done “automatically” as a result of the slicing or the shape of the arrays involved. Using python list comprehension this would achieve the same result:
new_buf = [[b[i,j] * random.uniform(0.99, 1.01)
                       for j in range(3)] for i in range(lenb)]
bufr.re_init(pts=new_buf)
And good old straightforward, easy to understand looping:
new_buf = []
for i in range(lenb):
  new_buf.append([])
  for j in range(3):
    new_buf[i].append(b[i,j] * random.uniform(0.99, 1.01))
bufr.re_init(pts=new_buf)
The reason for this apparent regression to a less obvious code format is speed. If you test the three alternatives with timeit you will find that the traditional looping takes 2.2ms, the list comprehension takes 1.95ms and numpy takes 0.08ms, a massive margin that only increases as the array gets bigger.
The Buffer.unib array of uniform variable passed to the Shader needs a bit more explanation than the equivalent array in Shape. ntile is used to control how many normal map Texture maps (also called bump maps) are to be tiled for each unit of texture coordinates. Normal maps will be explained fully in the chapter on Light and Texture but they are a way of adding structural detail to a surface without having to make it from millions of vertices - have a search on google if you’re curious. shiny controls how much reflection is produced by the mat_reflect or uv_reflect Shaders. blend is a variable set during the draw() process depending on whether the Texture values taken from the image file are to be blended or not. If the alpha value of the pixel is below this value then the pixel will be “discarded”. This will be covered in detail later but it allows sharp edges to be produced around shapes constructed from png images with large areas of transparency. material is the RGB values for this Buffer when drawn using a material Shader. umult and vmult control the tiling of the Texture map (the color one as opposed to normal or reflection). point_size is the size in pixels of vertices drawn by the Points object. u_off and v_off are the tiling offsets that go with vmult and umult. line_width is the size in pixels drawn by the Lines object.
Display
Although there could have been a case for making Display create a default instance of itself in the same way that Camera, Light and Shader do, there are various reasons why this would be messy, the most obvious of which relate to how the main loop would be structured.
In pi3d we have chosen to make the loop an explicit python while ..: with a call to a central loop_running() used to do various once-per-frame tasks, tidy up GPU buffers and close things down when the program finishes. Many other user interface frameworks have adopted a more event oriented “hidden” loop style but our reasoning was that it only makes sense to use the GPU and OpenGL where frames per second are of central importance, so in pi3d the main loop is made very visible.
Open pi3d/Display.py in an editor and look though the docstrings, all of which should be self-explanatory. There are some more obscure but occasionally useful arguments to the create() function [4].
| [1] | numpy http://www.numpy.org/ is an important addition to python that can dramatically improve performance. Although it’s quite hard to get the hang of, it’s definitely worth persisting. |
| [2] | python doesn’t have formal name-space control seen in other languages where attributes and methods are declared public, private, protected etc. However the convention is to use underscores as the first letter to indicate that a method is not intended for “external” use. Similarly pi3d adopts standard upper case names to denote global “static” variables. |
| [3] | using cross product http://en.wikipedia.org/wiki/Cross_product |
| [4] | something not explained very clearly elsewhere is the samples argument to create() this can be set to 4 and will give much better anti-aliasing i.e. prevent the stepped edges of diagonals of contrasting color. However using this will prevent pi3d from creating a Display on computers running windows. This might be because of the functionality of DirectX and the OpenGL ES emulators for windows (even Linux virtual machines under windows). |